Learn how to start a food blog and set up your wordpress account. Simple step by step chapter to help your grow your blogging career!
It’s another learning day friends! We have been doing these since the past two weeks and today is the third session.
If you remember, we started our Class 101 three weeks ago on How to Start A Food Blog…
We divided the class into 4 parts :
- Chapter 1 – Setting up your Identity ( Picking a Name, Buying a Domain & a hosting Plan)
- Chapter 2 – WordPress Installation + Theme Selection
- Chapter 3 – Setting up WordPress + How it works
- Chapter 4 – Selecting Plugins+ Beginning your Blog
Ok so today we are going to pick where we left last time. Last time we showed you how to set up wordpress Installation.
As we mentioned last time either you can go with free themes or paid ones. You might think why pay when there are already free themes available?!
Well I agree but I don’t agree so much. Hear me out, yes it’s great when things are free but then there’s always a catch! You want to get a PAID theme which suits your style, is SEO friendly, helps in making your site rank better and allows you to do lots of cool customizations.
You don’t have to spend crazy amount of money on themes. There are lots available at quite reasonable price.
When I started blogging after a year I went with Thesis Theme for WordPress which was great for my basic needs. I absolutely loved it and was really happy with it.
Recently I switched to Genesis Framework with Foodie Pro Theme as a child theme. This is my favorite theme of all times and perfect for all our growing needs.
Now once you buy the theme of your choice, you have to upload it in your wordpress site. Then you activate the theme.
Now you might wonder either you should go with THESIS or GENESIS FRAMEWORK . If you are looking to customize your site but you are ok to do some coding then THESIS is the way to go.
GENESIS framework is perfect and SEO friendly but if you want very simple customizations then make sure you buy FOODIE PRO child theme which is perfect for food bloggers.
For Thesis theme , once you buy your theme. Go to Appearance ->> Themes ->> Add new ->> UploadTheme ->> Upload the THESIS file you just downloaded.
Once it’s uploaded to your website server, activate it. Now you have THESIS theme active.
Now for customizing Thesis theme, I found that you have to know how to use a customizer which for a person like me turned out to be really hard.
One the theme is activated, it can be customized. There are many options to customize it the way you want.
I will talk about how to activate Genesis + Foodie Pro theme as that’s what I have been using right now and if you feel you are getting serious about blogging, then this theme is a GREAT choice to go with.
First upload both Genesis & Foodie Pro themes just the way you uploaded Thesis in case you went with Thesis theme. Go to Appearance ->> Themes ->> Add new ->> UploadTheme ->> Upload the Genesis framework and then Foodie Pro child theme file you just downloaded.
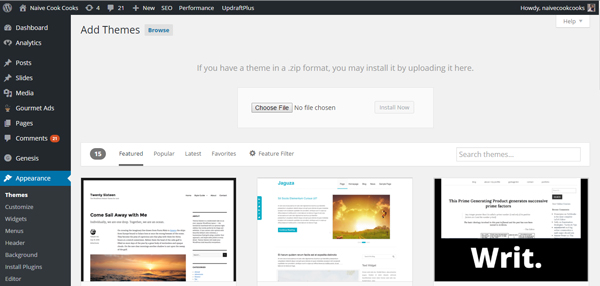
Once you have both of these uploaded, first activate Genesis framework and then go ahead and activate your Foodie Pro child theme.
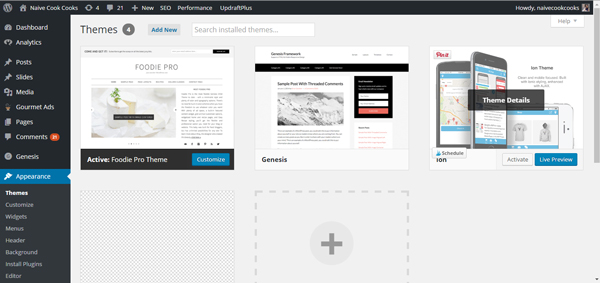
Then click on Customize on Foodie Pro theme and you can customize the basics such as header image, colors, background, menus, widgets and others.
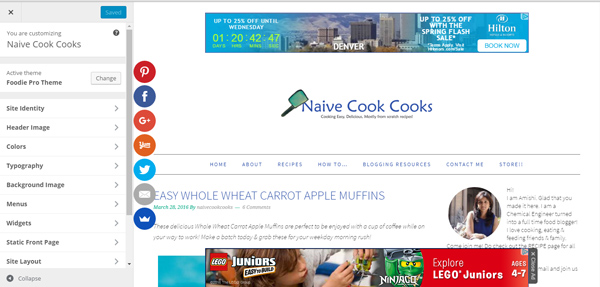
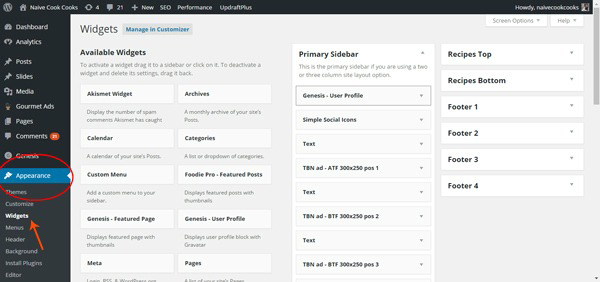
Once done with that, check out APPEARANCE and then start by adding widgets. Widgets are basically all the things you see in side bar such as search box, ads and whatever else you want.
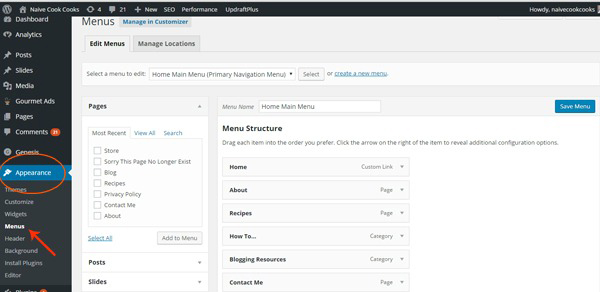
After widgets, move on to MENUS and Menu is basically the menu you see under your header image. You can add whatever categories you want to add and customize it the way you want. If you go our blog homepage, you will see we have Home then about then recipes and so on in our menu.
Once you are done with customizing all this, move on to customizing some other basic features which will help you start your blogging journey.
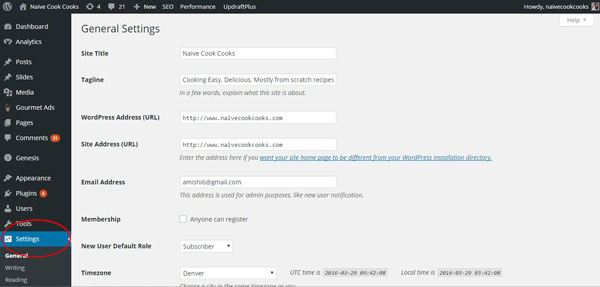
Click on settings in the General settings and left hand sidebar and go to each of the categories underneath it. First click on General settings and there you can fix t he basics such as add your blog name, tagline, url of your website, email address and timezone. Save the changes.
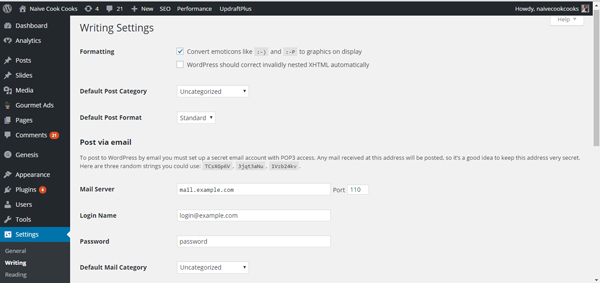
Now go to Writing settings. You can fill up few things such as Formatting, default post category which I like to keep as uncategorized and put default post format as standard.
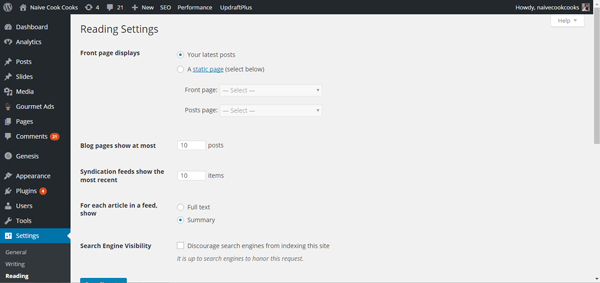
Then move to Reading part in settings and there you can customize how you want to your front page display to be, how many posts you want your blog pages to show and some more such stuff.
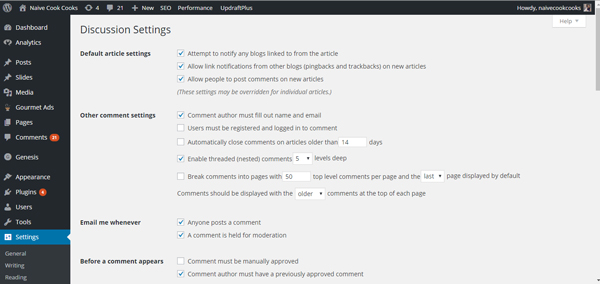
After that we go to Discussion and in default article settings as you can see I check mark all of them and then I customize my “other comment settings” and all the others. I can’t exactly tell you what to put where as they will be different for each indivisual so pick and choose what you think is best for your work.
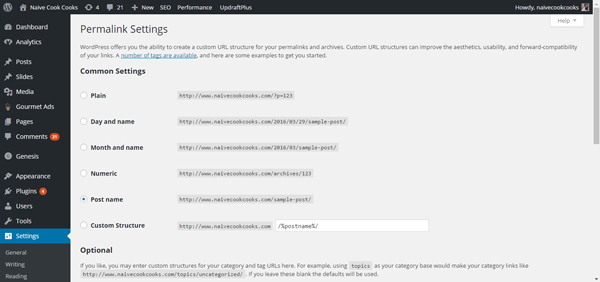
And lastly we go to Permalink in settings and in common settings you can pick the way you want your custom url to be and it’s always good to have post name in url so pick the one which says post name.
And that’s pretty much it in our Setting up wordpress post. Now you have all your basics set up the right way. Go ahead and start blogging. Next week we will get back to our regular posting day of Sunday and I will be showing you how you can set up your blog injust few minutes and start blogging. After that in your free time, keep going through our chapters and keep giving fixing your blog!
Happy blogging friends!







Your lesson helped me to arrange my menu which I was trying to figure out by going into codes and all. Many thanks. Very clearly explained.
Kanika glad this was helpful foryou 🙂 Would love to know what other kind of posts are you looking for for improving your blog?
Hi…Your posts found to be very useful.. I am in the verge of starting a food blog.. I have so many queries… But, I just ask you a quick query now.. how do we promote our blog? Is it through Facebook, Twitter , Pinterest , ,youtube ? Before promoting the blog, do we have to build the website by uploading the recipes??
Thanks…